Share

Rock Climbing, Abseiling & Canyoning

Rock Climbing Gym: 5 Exercises That Will Make You A Better Climber

Workouts to get you climbing fit

Rock climbing is a demanding sport that requires great mental focus coupled with powerful physical strength. The world’s best climbers condition themselves to tackle the toughest routes because they know they’ve got to trust their bodies when they’re hanging off a mountain, hundreds of meters above the ground, by just their finger tips.

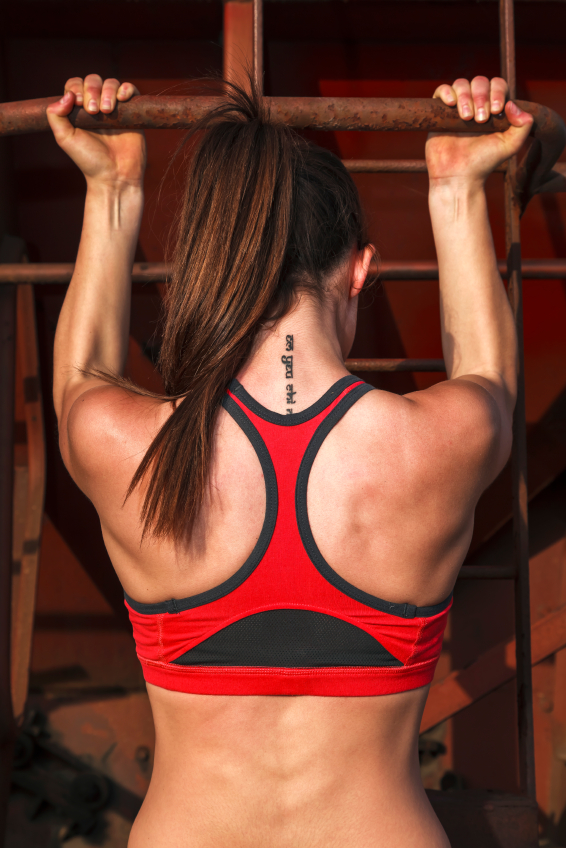
Rock climbing requires full body fitness, from upper body and core strength to suppleness, flexibility and a firm grip, so any workout session will always be varied and challenging.

The great thing about training for rock climbing is that you don’t have to have an expensive gym membership or a tonne of complicated equipment.

Rock climbing is about learning to move your bodyweight as efficiently as possible so the most important piece of equipment for any rock climbing gym workout your own body, which means you can train almost anywhere.

…anywhere the fashion police will let you that is – Photo: iStock.com

It doesn’t matter how much you can bench press or how many miles you can run compared to your mates, because rock climbing gym workouts are personal to you. It’s all about how far you can push yourself, how easily you can lift your body and how effectively you can control your position on the wall. Your biggest challenge and training tool is your own body’s limits.

The trick with all of these exercises is gradually increasing the duration and number of repetitions you do, building up strength and flexibility a bit at a time so don’t worry if you can’t even do one pull up yet. Every time you workout you’ll be improving your body tone and capacity, making it easier to do the same exercises next time round as your body develops to better perform the moves that’ll help you conquer any rock climbing challenge.

Pull Ups

Pull ups aren’t just for kids who wet the bed – Photo: iStock.com

Works Out: Arms, shoulders, back and core

Good For: Climbing in general

There’s no getting away from it, arm strength is important to climbers which is why the humble pull up is a major part of nearly all rock climbing workouts.

Pull up bars are pretty cheap and easy to install so it’s a good idea to put one in the doorway of a room you use a lot, like the kitchen for example. Every time you go into that room make yourself do just a single pull up and you’ll gradually build strength without even realising it. If you don’t have a pull up bar available any horizontal bar that can take your weight will do. You could even pop down to the climbing frame at your local play park, if you can handle the odd climbing baby, or find a nearby tree with a suitably sized branch.

Technique: When they first start pull ups, most people use an underhand grip with their fingers facing back towards them, which is good for developing bicep and back muscles. Try using an overhand grip too, with your fingers facing away from you because that engages more of your back and shoulders than an underhand grip and also more closely resembles the common motions of climbing.

Admitting you need help with a pull up is better than spending the night stuck in a tree – Photo: iStock.com

When you feel comfortable doing short pull ups, from a standing position bringing your shoulders to the bar and then back down, you should progress to long arm pull ups.

Bend your knees and lift your feet off the floor until you’re hanging below the bar with your arms fully extended. Perform your pull up and return to the same position without putting your feet on the floor, aiming for 5-10 repetitions before you stop. To get the most out of this exercise try to pull up slowly and smoothly and then descend slowly and smoothly too. This is effectively a double work out, using your muscles on both the ascent and descent while exercising your core too.

Variation: Once you’ve mastered the basic pull up, there are loads of different variations you can try. One of the most popular styles of pull up for rock climbers is called the Frenchie, nicknamed after the French climbers who popularised it back in the 80s.

Frenchies build on the slow up, slow down style of pull up that you’ll already have practiced. Starting from a long arm position pull yourself up to the bar and then hold that position for a count of 5 before slowly lowering yourself back to your start position. Next, do a pull up and then lower yourself until your arms are at 90º,. Hold that for 5 then return to the start position again. Finally do a third pull up and lower until you are two thirds of the way down. Hold for 5 seconds and then return to your start position.

A complete set of three pull ups counts as one Frenchie which is pretty demanding, so aim to gradually build up the repetitions until you can do 3-5 Frenchies in one go. This pull up variation will build great upper body strength and also massively improve your ability to lock your arms while climbing, giving you more time to look at and plan your next move.

Plank

How to look like a proper plank – Photo: iStock.com

Works Out: Core strength

Good For: Balance, positioning and movement on the wall

Your arms are important while rock climbing but without a strong core you’ll find it difficult to tackle anything but the easiest routes.

Core muscles are used almost constantly while you’re climbing and are especially useful when you’re taking on overhangs with precarious climbing holds or routes that require good balance. Strong core muscles compliment nearly every other body movement, making it easier for muscles in other parts of the body to do their job too.

When it comes to core workouts most people go straight for the sit up. This is an ok starting point for your core and abdominal work outs but there are lots of other exercises that develop your core more efficiently, among these alternatives is the punishing move known as a plank.

Technique: Not to be confused with planking, a plank is an isometric exercise which strengthens your shoulders, abdominal muscles and back.

To perform a plank, get down in the press up position but rest your weight on your forearms instead of your hands. Level your body so that it forms a straight line from your ankles to your shoulders and tighten you stomach, pulling your belly button back towards your spine. Once you feel stable, hold this position for 20 seconds, then repeat the exercise 3-5 times.

Variation: When you’ve mastered the basic plank it’s time for a couple of variations, the first of which is the aptly named mountain climber plank.

The mountain climber is a great combination of leg and core exercise which also helps build flexibility for those tight and awkward positions you can find yourself in on the wall. Longer durations of this exercise can also work as a great warm up or short aerobic workout.

The second plank variation is the plate transfer plank. For this you can use spare free weights or any number of small, heavy objects that you can lift with one hand.

With plate transfers you’re aiming to maintain the plank while moving the plates from one side of your body to the other. This lengthens the duration of the plank, adds a little grip and pull strength into the mix and increases the core workout as you’re balancing even more to maintain your plank position.

Bar Hangs

Hanging out on bars will improve your climbing way more than hanging out in them – Photo: iStock.com

Works Out: Grip and core strength

Good For: Hanging on to holds

It goes without saying that having good grip strength is vital for climbing. Being able to hang onto even the tiniest of climbing holds makes all routes easier and opens up new ways to tackle old problems. Trusting your hands also gives you the time and space to figure out your next move which helps you to climb more intelligently and efficiently, making better use of your other muscles.

The simplest way to improve grip strength is, pretty obviously, just to grip something. An easy way to do this at home is just to pick up something reasonably heavy with one hand. Try grabbing a full baked bean can by pinching along the lip of the can and holding it for 10 seconds. As your strength increases progress onto bigger or more awkwardly shaped objects, making sure not to drop any on your toes!

Another great way to build grip strength is with a bar hang. This super simple exercise will build your endurance and give you an arm and core workout at the same time.

No matter how good you are at bar hangs, people will always notice the sock sandal combo – Photo: iStock.com

Technique: Before you start it’s important to note that over training grip strength can cause strain and injury which can really hamper your climbing. For this reason make sure that you take things slowly when you begin training and if you’re in any doubt or discomfort just take a break for a couple of days and come back when your hands and arms feel up to it.

For a bar hang you usually use something like a pull up bar, but any horizontal bar or ledge that can take your weight will do. Ideally pick a spot that is above head height so that you can hang from it and straighten your legs without them touching the floor.

The bar hang is about as complicated as its name suggest. Simply grab the bar, extend your arms fully and lift your feet off the floor. The important thing here is to keep your body as straight and as still as possible. When you first start bar hanging you might find that your body swings a bit as you start the exercise. Learning to reduce your swinging by tightening your stomach and legs will improve your core strength and make it easier to hang on the bar..

For your first couple of attempts hold the bar hang for at least 10 seconds, progressing to longer periods as your strength grows. You can also try changing grip to overhand or underhand for variation or search out a ledge instead if you’re finding the bar too easy.

Variation: The first bar hang variation adds an extra core muscle kick via leg raises. With your arms extended in the bar hang position, lift your legs so they are at 90º to your hips, then return slowly and smoothly to the bar hang position to finish.

Aim for 10 to 15 repetitions to start with and once your comfortable try holding the your legs in the 90º position for 3-5 seconds before letting them down again. If you’re finding this difficult at first, start by just raising your knees to 90º until you’re ready to try the full leg. If instead you happen to be very flexible and find this too easy, aim to raise your legs higher, touching your toes to the bar if possible while keeping your back as straight and vertical as you can.

The second variation is hollow to arch hangs. This again looks deceptively simple but actually requires a large degree of subtle control and strength.

While hanging below the bar take up the hollow position by sucking in your stomach, pushing your legs slightly forward and pointing your toes. Hold this position for between 3-5 seconds and then arch you back, pushing your chest forwards and your legs back. Hold the arch position for another 3-5 seconds to complete one repetition, aiming at 10 reps to begin with.

Working to hold both the arch and hollow positions as still as possible will develop your core muscles and balance. At the same time you are continually putting your grip strength and endurance to the test as you constantly shift your weight, simulating the demands of moving on a rockface.

Press-Ups

Remember to take your time while doing push ups – Photo: iStock.com

Works Out: Shoulders, chest, forearms and core

Good For: Mantling

When you’re climbing, most people think about pulling themselves up the wall, but being able to push yourself up it is pretty important too.

In rock climbing, pushing yourself up on your arms is known as mantling. This useful skill can help you to scramble onto ledges and top out a route. A well timed mantle can also support almost any other move and can be used to give you extra reach or to tackle sections of bare wall, allowing you to get your feet into position for a move much higher up.

Mantling requires strong chest, shoulder and tricep muscles, parts of your body that are all developed by the classic press-up.

Press ups should be part of all climber’s workouts. Gecko impressions? Not so much – Photo: iStock.com

Technique: Most people have tried a press-up at some point in their life but few people have done them well.

First off, lie down in the classic press-up position, face down on the floor with your hands level with your shoulders, then push yourself up off the floor keeping your head in line with your body and your back and legs straight. Many people will let their heads drop or will push their bum off the floor before the rest of the body, but if you aren’t in a straight position you’re not getting the full benefit of this exercise.

While you’re doing your press-ups, keep your stomach muscles tight and make sure your shoulders stay level. It’s a common mistake to let your shoulders creep up towards your ears as you go down which can add extra strain to your triceps.

Hands are another area that can cause problems as many people move their hands forwards, level with their head rather than their shoulders. This again means you’re not working out the full range of muscles as well as you could, which defeats the point of the exercise. You also want to watch how you balance your weight on your hands. Pressing down through the heel of your hand can cause injuries to your wrist over time so try to push with the outside of your hand which is much stronger and more stable.

Finally, take your time. Make sure that you go fully up and down to within an inch of the ground. It’s common to see people doing lots of quick, short press-ups but they’re skipping the real workout. You also want to take your time dropping back down. Controlling your speed here will give your muscles an extra workout and develop your body control too.

Variation: Press-ups are another exercise that have tonnes of variations. Each style targets a different area of strength and plenty of these can be useful as part of a rock climbing gym workout.

As the name suggests, tricep extension press-ups focus in on your key pushing muscles, the triceps. Start the press-up in the normal position but this time with your forearms flat on the ground in front of you, elbows directly below your shoulders.

As you press-up, bring your weight onto your hands before returning smoothly to your start position. This variation can take a bit of getting used to and requires a little more strength than regular press-ups, so start by doing 5 reps at first, building up to 10 when you feel confident.

The second variation is the aptly named Spiderman press-up. This exercise won’t turn you into a superhero but it will give you extra pushing strength, a good core workout and some flexibility to boot.

Do a normal press-up, but this time when you go back down bring your right knee up as close to your right elbow as possible, keeping your foot off the floor. Return your right leg to the original position, placing your foot back on the floor and then on the next time down, raise your left leg to your left elbow.

As you take your weight off each foot you’re adding extra load onto your arms and core and stretching out your hips too. These are much more demanding than regular press-ups so start by doing 3 reps on each side and progress from there.

Heel Raises

Exercise will help your calves heel up quickly – Photo: iStock.com

Works Out: Ankles and calf muscles

Good For: Extra reach and footwork

It’s an often overlooked part of a rock climber’s body but your lower leg strength can make a big difference to your climbing.

Footwork accounts for half your points of contact on a climbing wall, forming a solid frame for your arms to grab the holds above. Strong legs are needed for taking your weight on tiptoes, pushing into pockets and giving you those vital extra inches of reach for tough problems. Your calves will be burning almost as much as your arms after a good climb so to help you build strength and endurance heel raises are a great idea.

Technique:

Heel raises are really easy. Stand next to a wall with your feet a comfortable distance apart. Place your hands on the wall to steady yourself and then, keeping your legs straight, raise your heels off the ground. Hold this position for 5 seconds before slowly returning your heels to the ground, aiming to do about 10 reps.

When you feel confident with your balance, move away from the wall and just use your core muscles and feet to balance you. This gives you an extra core workout, improves your balance and develops your leg strength more fully.

Variation: Just like the original exercise, the heel raise variation is simple to learn.

One foot heel raises are almost identical to the regular two foot version but this time your start position is slightly different.

Stand next to a wall and place one foot half a step in front of the other. Keeping your legs straight raise both your heels and put your weight forward, lifting your back foot off the floor. Hold this position for a count of 5 and then put your foot back down slowly as before.

This exercise demands a lot more from your ankle so take it slowly, especially if you have any previous injuries. Aim for 5 reps to start with, building up as your strength develops.

When you feel comfortable with this move, it’s time to step away from the wall again. Doing one footed heel raises without support takes a lot more effort and this time you’ll probably need to use your arms to balance. Try to concentrate your weight through your stomach and hips, this will centre your balance and make it easier to do the exercise.

To start with try for 5 reps with each foot, holding for 5 seconds at the top of the raise. Your calves might burn when you finish but you’ll be glad they did when your rock solid footwork helps you crack that next killer route.

You May Also Like

The Top 10 Mountain Biking Moments of 2015

6 Dirt Cheap Ski Holidays For When The Mountains Are Calling But Your Bank Account Is Empty

Share

Newsletter Terms & Conditions

Please enter your email so we can keep you updated with news, features and the latest offers. If you are not interested you can unsubscribe at any time. We will never sell your data and you'll only get messages from us and our partners whose products and services we think you'll enjoy.

Read our full Privacy Policy as well as Terms & Conditions.

production